My First Custom Excel-DNA Add-In (dotnet6 edition)

This is an upgrade to my earlier blog “My First Custom Excel Ribbon using Excel-DNA“, now written for dotnet core.

I add in Microsoft.Extensions support for dependency injection, configuration, and for logging, which should be an easy way to hook up to your app settings, plus quickly set-up your DI and logging frameworks of choice (e.g. https://www.nuget.org/packages/Autofac.Extensions.DependencyInjection & https://www.nuget.org/packages/Serilog.Extensions.Logging.

Just want the code?

https://github.com/andysprague44/excel-dna-azure-service-bus/tree/main/src/Skeleton.ExcelAddIn.

This is a short blog…

To get started, feel free to clone the project I link to above. This idea is that this is a skeleton project from which you can do what you want. For example, I wanted to call an Azure Service Bus to do some long running work (the other project in that solution, blog post coming soon!).

Be sure to use Visual Studio >= 2022 – this is a strong recommendation, I have tried Rider and it doesn’t fly.

Dependency Injection

Should work out of the box – – register your dependencies in the class ContainerOperations.cs.

internal static class ContainerOperations
{
	//Excel needs some extras help in only registering dependencies once
	private static readonly Lazy<IServiceProvider> ContainerSingleton = new(() => CreateContainer());
	public static IServiceProvider Container => ContainerSingleton.Value;

	//The DI registrations
	internal static IServiceProvider CreateContainer(string? basePath = null)
	{
		var container = new ServiceCollection();
		
		//register dependencies here...
        //e.g. container.AddSingleton<ExcelController>();

		return container.BuildServiceProvider();
	}
}

If you want to add support for a more fully featured DI framework, CreateContainer is the place to do so.

One thing of note is that Excel-DNA (or excel com, who knows) decides to try and call the CreateContainer method twice, so I wrapped in the Lazy singleton pattern to be defensive against this. I found out this when registering a dependency on something that has to be a singleton, and it was causing problems – in my case the Launch Darkly Client SDK (https://launchdarkly.com/).

Logging

I implemented Serilog in this project. If you prefer another logging framework, change the method ConfigureLogging in the ContainerOperations.cs class. This should be all that is required!

From there logging is via the higher level Microsoft.Extensions.Logging API.

private static ILoggerFactory ConfigureLogging(IConfiguration configuration)
	{
		var config = configuration.GetSection("AppSettings");
		var appVersion = config["Version"] ?? "Unknown Version";
		var serilog = new Serilog.LoggerConfiguration()
			.ReadFrom.Configuration(config)
			.Enrich.WithProperty("AppName", "My.ExcelAddIn")
			.Enrich.WithProperty("AppVersion", appVersion)
			.CreateLogger();

		return new LoggerFactory(new[] { new SerilogLoggerProvider(serilog) });
	}

Configuration / App Settings

ContainerOperations.cs is again the place where settings are initialized. This project uses the appsettings.json pattern to define (env specific) configuration. You can pass in the class AppSettings to the constructor of anything that needs it (see ExcelController for example). Nice!

basePath ??= ExcelDnaUtil.XllPathInfo?.Directory?.FullName ??
			throw new Exception($"Unable to configure app, invalid value for ExcelDnaUtil.XllPathInfo='{ExcelDnaUtil.XllPathInfo}'");
	
		IConfiguration configuration = new ConfigurationBuilder()
			.SetBasePath(basePath)
			.AddJsonFile("appsettings.json")
#if DEBUG
			.AddJsonFile("appsettings.local.json", true)
#endif
			.Build();

		var settings = configuration.GetSection("AppSettings").Get<AppSettings>();
		if (settings == null)
			throw new Exception("No appsettings section found called AppSettings");

		container.AddSingleton(_ => settings);

Where is the ribbon?

The CustomRibbon implementation is unchanged so feel free to refer to my original blog that set this up and re-use: My First Custom Excel Ribbon using Excel-DNA

That’s all folks!

Super Power your git config

git is the defacto way to manage source code, if you haven’t heard of git this blog is not for you.

If you are a software developer, data scientist, data engineer, dev ops engineer or frankly in any role that touches software development, and you haven’t heard of git … well, where have you been?

git config is the way to manage the default behaviors of git and I’d always recommend setting some basic config above what comes out of the box. Run the following in git console (or cmd line if git is on your env variables PATH):

git config --global core.autocrlf false
git config --global fetch.prune true
git config --global push.default true

In order, what the above is doing is:

  • core.autocrlf false: or true, lots of debate on this one (e.g. https://stackoverflow.com/questions/2825428/why-should-i-use-core-autocrlf-true-in-git) so just agree a convention in your team and stick with it
  • fetch.prune true: If the remote branch is deleted, it’s deleted from your “remotes/” branches locally, which just makes sense to me.
  • push.default current: Don’t have to specify the branch you are pushing (“git push -u feature/my-change”) , you always push the branch you currently have checked out (“git push”).

git alias’s

Alias’s are really cool way to type less when doing the basic git operations you do everyday, and also as a way to remember the more complicated ones so you don’t have to. For example

  • git co rather than git checkout
  • git c 'my message' rather than git commit -m 'my message'
  • git rom rather than git fetch; git rebase origin/master
  • git track rather than branch=$(git rev-parse --abbrev-ref HEAD); git branch --set-upstream-to=origin/${1-$branch} $branch;

Might not seem a lots but if you are typing these multiple times an hour for the rest of your working life, it adds up!

To add a single alias:

git config --global alias.co checkout

To add a bunch, it’s probably easier to open the actual .gitconfig file: git config --global --edit. If this opens something unmanagable like a vim editor (see next section), remember the location of the file and open it in notepad or your favorite text editor.

Then add the following, or pick and choose, or add your own!

[alias]
	s = status
	co = checkout
	c = commit -m
	a = add .
	ac = "!f(){ git add . && git commit -m \"$1\";};f"
	l = log --oneline -10
	caa = "!f(){ git add . && git commit -a --amend -C HEAD; };f"
	dad = !curl -s https://icanhazdadjoke.com/
	ptag = push origin --tags
	cp = cherry-pick
	cpc = cherry-pick --continue
	rb = rebase
	rbc = rebase --continue
	rom = "!f(){ git fetch; git rebase origin/master;};f"
	spull = "!f(){ git stash; git pull; git stash apply;};f"
	wip = "!f(){ git add .; git commit -m \"WIP\";};f"
	url = remote get-url --all origin
	mt = mergetool
	mc = merge --continue
	track = "!f(){ branch=$(git rev-parse --abbrev-ref HEAD); git branch --set-upstream-to=origin/${1-$branch} $branch; };f" 

Now to use your alias you can replace the long version with the short version. For example: git ac "short description of my change", adds all local changes and commits them.


git text editor

Setting additional defaults to use a sensible text editor when user input required is also a game changer. The below is relevant for vscode, but there are equivalents for notepad++, atom, or any other sensible text editor; google is your friend.

[diff]
	tool = vscode
[difftool "vscode"]
	cmd = code --wait --diff $LOCAL $REMOTE
[merge]
	tool = vscode
[mergetool]
	trustExitCode = false
	keepBackup = false
	keepTemporaries = false
[mergetool "vscode"]
	cmd = code --wait $MERGED
[core]
	editor = code --wait

Now if you run something like git mergetool, your merge conflicts will open in a new vscode window and you can resolve them there with vscode’s support. Or, git config --global --edit.


git init

Last but not least, support for git templates is something I use often, for adding some commit hooks whenever you initialize a new git repo or checkout a new one from a remote.

[init]
templatedir = ~/.git-templates

Then add a ‘.git-templates’ folder in the same location as the ‘.gitconfig’ file. Then inside that a folder “hooks” and 2 files (no file extension):

post-commit

#!/bin/sh

#Print commit hash
git log -1 --format=format:%h

pre-push

#!/bin/sh

# adds a link to generate an Azure DevOps PR on the command line
# for github change to something like `$url/$branch/compare`
url="$2"
branch=$(git rev-parse --abbrev-ref HEAD | sed 's./.%2F.g')
echo ""
echo "Create PR at: $url/pullrequestcreate?sourceRef=$branch"
echo ""

It should look something like:

This adds a link to generate a PR on the command line. The above is specific to Azure DevOps and will need to be played around with for you git provider. e.g. something like echo "Create PR at: $url/$branch/compare” might work for github.


That’s all folks!

Diagrams as Code – C4 diagrams with Azure icons

This article is very persuasive. By the end you will wonder why you ever used Visio. It gets more technical as you progress, so stop reading whenever you want (I suppose this is true whether I wrote this sentence or not).

I discuss:

  • C4 diagrams (and why)
  • how to use code to generate them (and why)
  • how I have gone about doing it (plantuml, Azure icons, font-awesome-5 icons).

Just want the code? https://github.com/andysprague44/sprague.andy.plantuml.c4

C4

C4 diagrams are a great way to visualize a system design from different levels of detail. You share C1 with the CEO, C2 with the CTO and stakeholders .. and then you never need to create C3 and C4 diagrams for lower level detail as this emerges from a good code base and face-to-face discussions within the team (or, at a push, it’s a photo of a whiteboard sketch).

For more on what C4 is, see https://www.infoq.com/articles/C4-architecture-model.

Diagrams as Code

Diagrams as code (DaC)…

  • How many times have you seen a Visio diagram in a power point presentation shared with you, that you want to correct / update / use as a template?
  • Did the original visio file come with that? [If it did, go and congratulate the author right now!]
  • Or, worse, the diagram was created in powerpoint [dragging rectangles for a few hours anyone?]

In addition, systems change and evolve, and it’s not often that the diagrams evolve with it.

Solution? Put the diagrams with the code, in the same repo. Ergo, Diagrams as Code.

Now, you could just save the visio / powerpoint / png to the repo, but here comes the second advantage of diagrams as code – the “code” is essentially a text file that describes a diagram, and then that diagram is generated for you. You may have to do some massaging to get it to display exactly as you want, but it’s much better and time efficient to add/delete 1 line of a text file, than dragging rectangles around on a WYSYWIG editor for a few hours, in my humble opinion.

If you disagree, the rest of this article is not for you (spend the time you save by not reading on to have a strong word with yourself and question your life priorities).


plantuml

There are a plethora of Diagram as Code solutions out there. I choose plantuml for it’s simplicity, because it’s not tied to a particular programming language, and because it has a vs code plugin.

The example diagrams on the plantuml site are not pretty, so I suggest you start with C4 support in the standard library: https://github.com/plantuml-stdlib/C4-PlantUML. For implementation agnostic C4 diagramming with plantuml start here, and do not read further.


plantuml in vs code

plantuml has plugins for many IDEs and text editors, see if yours is supported here: https://plantuml.com/running -> Text editors and IDE.

For VS Code … install extension “PlantUML”

Add a file testdot.wsd with these contents:

@startuml test
testdot
@enduml

Right click and selection “Preview Current Diagram” (shortcut Alt + D), you should see something like:


We got here… creating diagrams!

The easiest thing to do here is to give you my template, that supports C4, Azure and font-awesome icons (e.g. a component to represent an excel file). Copy to your project, and get diagramming!

@startuml C1_MyApp_SystemContext
'Alt + D to preview
!pragma revision 1

'C4
!includeurl https://raw.githubusercontent.com/RicardoNiepel/C4-PlantUML/master/C4_Context.puml
!includeurl https://raw.githubusercontent.com/RicardoNiepel/C4-PlantUML/master/C4_Container.puml
!includeurl https://raw.githubusercontent.com/RicardoNiepel/C4-PlantUML/master/C4_Component.puml

'Azure
'Search the full list here: <https://github.com/RicardoNiepel/Azure-PlantUML/blob/master/AzureSymbols.md#azure-symbols>
!define Azure https://raw.githubusercontent.com/RicardoNiepel/Azure-PlantUML/master/dist
!includeurl Azure/AzureCommon.puml
!includeurl Azure/AzureC4Integration.puml
!includeurl Azure/Web/AzureWebApp.puml

'Comment/uncomment the next line for simplified view of Azure sprites
'!includeurl Azure/AzureSimplified.puml

'FontAwesome and other icon sets
' Search the full list here: <https://github.com/tupadr3/plantuml-icon-font-sprites#icon-sets>
!define ICONURL https://raw.githubusercontent.com/tupadr3/plantuml-icon-font-sprites/v2.4.0
!includeurl ICONURL/font-awesome-5/file_excel.puml

title [System Context] My Application

'left to right direction

Person(personAlias, "Label", "Optional Description")
AzureWebApp(containerAlias, "Label", "Technology", "Optional Description")
Component(systemAlias, "Label", "Technology", "Optional Description", $sprite=file_excel)

personAlias --> containerAlias : Uses\n[Optional Technology]
containerAlias -right-> systemAlias #Purple : Generates

@enduml

Layout Tweaking

I prefer to use the –> syntax for defining arrows over the “Rel” component of C4 library as it seems to give more control over how the diagram gets rendered.

For some ways to play around with the formatting start here: https://crashedmind.github.io/PlantUMLHitchhikersGuide/layout/layout.html.

Use sparingly! If you customize the format too much, it makes changes in the future harder as you’ll need to play around with getting it “just right” all over again.


That’s all folks!

Python – (Ab)Using Environments

So I recently picked up a legacy(ish) python application that had a CI/CD pipeline that built from a setup.py file (think: python setup.py build). I wanted to create a local dev environment using the only sensible choice (excluding docker) – conda. I also wanted to utilize an environment.yml file to give new developers a very quick path to creating an exact match of the environment. Finally – I’m lazy*, and did not want to re-engineer all of the existing CI/CD pipelines to use conda.

I’m not going into much detail here, if you are new to environment.yml files read this first: https://conda.io/projects/conda/en/latest/user-guide/tasks/manage-environments.html.

I also welcome any feedback or better approaches in the comments, mixing “python environment management” paradigms is playing with fire.

* maybe lazy is the wrong word – my choices on how to setup my local dev env should not necessarily impact how it’s deployed in production. Put another way – one might not have the capacity or influence to change that decision in a large organization.

setup.py

Option 1 – get me a conda env please!

from setuptools import setup, find_packages

config = {
    'description': 'andysprague.com tutorial helper',
    'author': 'Andy Sprague',
    'url': 'andysprague.com',
    'version': '0.0.1',
    'install_requires': [
        'requests==2.7.0',
    ],
    'packages': find_packages(),
    'name': 'myapp'
}

setup(**config)

Given the above as a starting point (from my legacy app), how to spin up a local conda env, and persist as an environment.yml file?

conda create -n mycondaenv python=3.9 -y
conda activate mycondaenv
python setup.py develop
conda env freeze > environment.yml

We have lift-off! Now my new developer Bob can run this to get their env up and running:

conda env -f environment.yml -n bobcondaenv
conda activate bobcondaenv

The environment.yml file is (after tidy up):

# environment.yml
name: myenv
channels:
  - defaults
dependencies:
  - pip=22.2.2
  - python=3.9.15
  - pip:
    - requests==2.7.0

Downside? You are now maintaining library versions in 2 places: the setup.py file, and the environment.yml file. Trust me when I say they will not remain in sync,

… and that you’ll only find out in production!

requirements.txt

So how can we link environment.yml, to pull dependencies from setup.py? We need a go-between, which is probably familiar to you my avid python reader … it’s the requirements.txt file of course. We can set up a requirement.txt file like this, so it uses the setup.py file for the list of dependencies:

# requirements.txt
-e .

And the environment.yml file can reference the requirement.txt file (neat!):

# environment.yml
name: myenv
channels:
  - defaults
dependencies:
  - pip=22.2.2
  - python=3.9.15
  - pip:
    - -r requirements.txt

Now our dev env and our production remains in sync, and we can have a quick path to productivity for any new developers.

Bonus Content

We want to add some unit testing, right? We also want our IDEs to do linting, formatting and autocomplete? What about support for jupyter notebooks for data exploration?

We don’t need those in prod though. We have accidentally introduced a separation of concerns above: environment.yml for dev, setup.py for prod. We can specify dev only resources in our environment.yml file!

# environment.yml
name: myenv

channels:
  - defaults

dependencies:
  - pip=22.2.2
  - python=3.9.15

  # Test/Dev
  - autopep8
  - pylint
  - pytest
  - mock

  # Jupyter: run `jupyter notebook`
  - notebook
  - nb_conda_kernels
  - jupyter_contrib_nbextensions
  
  # Actual application dependencies
  - pip:
    - -r requirements.txt

Happy coding!

Azure Table Storage – QueryAsync

Quick one today. I have been playing around with Azure Table Storage using the “WindowsAzure.Storage” library in dotnet, and was failing to find anything useful on querying multiple rows. Using the ‘TableContinuationToken’ was a little confusing to me, and a lot of the example on the net are out of date (who knows, this may also be out of date by the time you read it!).

The below extension method works for at least WindowsAzure.Storage v9.3.3.

using System.Collections.Generic;
using System.Threading.Tasks;
using Microsoft.WindowsAzure.Storage.Table;

/// <summary>
/// Get rows from an Azure Storage Table.
/// </summary>
/// <typeparam name="TEntity">type of entity, extending Microsoft.WindowsAzure.Storage.Table.TableEntity</typeparam>
/// <param name="table">the CloudTable, e.g. _tableClient.GetTableReference("table_name");</param>
/// <param name="tableQuery">a TableQuery object, e.g. for filter, select</param>
/// <returns></returns>
public static async Task<List<TEntity>> QueryAsync<TEntity>(
	this CloudTable table,
	TableQuery<TEntity> tableQuery) where TEntity : TableEntity, new()
{
	List<TEntity> results = new List<TEntity>();
	TableContinuationToken continuationToken = default;
	do
	{
		var queryResults = await table.ExecuteQuerySegmentedAsync(tableQuery, continuationToken);
		continuationToken = queryResults.ContinuationToken;
		results.AddRange(queryResults.Results);
	} while (continuationToken != null);

	return results;
}

And here is how to use it:

public class MyEntity : Microsoft.WindowsAzure.Storage.Table.TableEntity
{
    public string AnotherField { get; set; }
}

var storageAccount = CloudStorageAccount.Parse(connectionString);
var tableClient  = storageAccount.CreateCloudTableClient();</p>
var table = tableClient.GetTableReference("table_name");

//To get all rows in a single partition
var tableQuery = new TableQuery<MyEntity>().Where(TableQuery.GenerateFilterCondition("PartitionKey", QueryComparisons.Equal, "partitionKey"));
List<MyEntity> results = await table.GetAsync<MyEntity>(tableQuery);

//To get all rows
var tableQuery = new TableQuery<MyEntity>();
List<MyEntity> results = await table.GetAsync<MyEntity>(tableQuery);

You can build up more complex queries using the TableQuery object, there is plenty of material that covers that, e.g. <https://vkinfotek.com/azureqa/how-do-i-query-azure-table-storage-using-tablequery-class.html&gt;

That’s all folks!

Flask Blueprint for Microsoft Azure AAD Authentication

This blog post takes you through adding authentication to a Flask application, using a blueprint, connecting to Microsoft Azure AAD using MSAL Python library.

The hope is, you can grab the blueprint, and drop it in to your flask application, authentication done bish-bash-bosh, and then spend your time doing the more interesting stuff. You won’t have to code up any authentication endpoints!

As always, go to the “I just want the code” section if you want to simply drop the blueprint into your app as quickly as possible without the detail.

  • Part 1 of this blog will go through how to use the blueprint in your own flask app.
  • Part 2 will talk a bit about what is going on under the covers of the blueprint code.
  • Part 3 is a ‘bonus feature’ of this application: As I was originally trying to figure out how to authenticate a plotly dash web app with AAD, I will show you how to do this with the same blueprint.

A future improvement might be to add this to flask-login, but, I didn’t. *shrug*

Prerequisites

  • You have a Microsoft Azure account, or you can create a free one.
  • You have the necessary permissions to create an app registration in the account
    • true if using the free account, or if you own your account
    • true if you own or can create a new/test ‘azure active directory’ within the account
    • not always true if you work for an organization with a DevOps / InfoSec function – but in this case you can ask them to add on your behalf
  • You have heard of Flask
  • Have install of python 3.x

I just want the code

Complete example project: https://bitbucket.org/andysprague44/flask.aad 

Authentication blueprint you can lift and drop into to your existing flask app: https://bitbucket.org/andysprague44/flask.aad/src/master/blueprints/auth/

Part 1: How to use the flask authentication blueprint

Given an existing Flask app, how can we secure it?

1a. Add an Azure App Registration

For the Flask App to accept authentication requests from it’s users it needs to be ‘trusted’ in the AAD domain. This is achieved by creating an ‘App Registration’, which represents the application in Azure-AAD-land.

1. Navigate to ‘Azure Active Directory’ in the left hand menu, then App registrations. Click ‘New registration’

NewAppRegistration_AzurePortal

2. Create the App Registration. Give it a useful name, choose the account types according to your needs, and add an initial redirect URL:

RegisterAnApplication_AzurePortal

3. Add ‘App Roles’ (for more info, see https://docs.microsoft.com/en-us/azure/active-directory/develop/howto-add-app-roles-in-azure-ad-apps). Go to ‘Manifest’ tab in your app registration, and replace the line 

“appRoles”: [],

with the following (change ‘DemoApp’ to the name you chose for the app reg in step 2):

"appRoles": [
 {
 "allowedMemberTypes": ["User"],
 "description": "Read Access",
 "displayName": "DemoApp Read",
 "id": "a8161423-2e8e-46c4-9997-f984faccb625",
 "isEnabled": true,
 "value": "DemoApp.Read"
 },
 {
 "allowedMemberTypes": ["User"],
 "description": "Write Access",
 "displayName": "DemoApp Write",
 "id": "b8161423-2e8e-46c4-9997-f984faccb625",
 "isEnabled": true,
 "value": "DemoApp.Write"
 },
 {
 "allowedMemberTypes": ["User"],
 "description": "Admin Access",
 "displayName": "DemoApp Admin",
 "id": "f2ec0750-6aee-4640-8f44-e050b8e35326",
 "isEnabled": true,
 "value": "DemoApp.Admin"
 }
 ],

4. Give your user the required app role(s), see https://docs.microsoft.com/en-us/azure/active-directory/develop/howto-add-app-roles-in-azure-ad-apps.

  • Note that, in the blueprint, if a user has Admin they are assumed to have Write & Read, and if the user has Write they are assumed to have Read.

1b. Adding the blueprint

My project assumes you are using the Flask Application Factory Pattern, if you are not, well, you should be, so change your project structure then come back to this tutorial. If you can’t be bothered, then fine (I guess), but you are somewhat on your own in hooking up this blueprint!

Good to carry on? OK then…

First, drop in the entire ‘auth’ blueprint folder into your app. I’ve assumed this is added to the path “blueprints/auth” relative to the project root.

Then, add the following to your requirements.txt file:

msal==1.6.0
flask-session==0.3.2

Then, register the blueprint in your app.py file, and use the decorator function login_required to secure your flask routes:

from flask import Flask
from werkzeug.middleware.proxy_fix import ProxyFix
from flask_session import Session
from . import appsettings as config
from blueprints.auth.decorators import login_required

def create_app():
    """Construct core Flask application with embedded Dash app."""
    app = Flask(__name__)
    app.config.from_object('application.appsettings.FlaskConfig')
    Session(app)
    
    with app.app_context():
        # Register Flask routes
        @app.route("/")
        @login_required #**This decorator authenticates the flask route**
        def index():
            return render_template('index.html', user=session["user"], version=msal.__version__)
        
        # Register blueprint for auth
        from blueprints import auth
        app.register_blueprint(
            auth.construct_blueprint(config.AuthenticationConfig),
            url_prefix='/auth')

        # Fix "flask.url_for" when deployed to an azure container web app
        # See https://github.com/Azure-Samples/ms-identity-python-webapp/issues/18#issuecomment-604744997
        app.wsgi_app = ProxyFix(app.wsgi_app, x_proto=1, x_host=1)
    
    return app

Note that the example project splits out the flask routes to a routes.py file, but the approach is the same.

When registering the blueprint, you’ll note the object config.AuthenticationConfig being passed in. This is a dict with the following keys, to add to a appsettings.py file (or perhaps a config.py in your own flask app):

# Config required by the authentication flask blueprint
AuthenticationConfig = {
    "TENANT": tenant,
    "CLIENT_ID": client_id,
    "CLIENT_SECRET": client_secret,
    "HTTPS_SCHEME": https_scheme
}
  • tenant: from your App Registration overview page this is the guid which at the time of writing is called “Directory (tenant) ID”
  • client_id: from your App Registration overview page this is the guid which at the time of writing is called “Application (client) ID”
  • client_secret: from your App Registration, go to ‘Certificates & secrets’ page, and add a new client secret. Copy the value. Do not check this one into source control!
  • https_scheme: this is either ‘http’ or ‘https’. While running locally this can be ‘http’ but should always be ‘https’ when deployed to production.

*Important*: Your flask session needs to use server-side sessions, to avoid the error “The “b’session'” cookie is too large”. Add SESSION_TYPE = 'filesystem' to your flask app configuration:

app.config.update(SESSION_TYPE = 'filesystem')

1c. Configuring your application

My approach to configuration is pretty ‘dotnet’-like (with appsettings.json files), so you may prefer something like python-dotenv; fine by me. However, if you are using the demo application, including it’s configuration approach (rather than grabbing the blueprint alone) you’ll need to do the following:

  1. Copy file appsettings.json and rename the copy to appsettings.Development.json
  2. Leave appsettings.json alone (do not add your secrets here!)
  3. Add your application config, including secrets, to appsettings.Development.json, noting that this file is ignored by git
  4. If you add/remove keys, make sure to also update appsettings.py where the settings are materialized.

You can then configure the application authentication blueprint differently per environment, by having different application registration entries and adding the config to an env specific appsettings.{env}.json file.

If you are using your own configuration approach, you will need to construct the dict somewhere, and pass it into the blueprint.

# Config required by the authentication flask blueprint
AuthenticationConfig = {
    "TENANT": tenant,
    "CLIENT_ID": client_id,
    "CLIENT_SECRET": client_secret,
    "HTTPS_SCHEME": https_scheme
}

1d. Wrap up

With any luck, you should now be able to run your application locally, and have your flask app up and running with Azure AAD without coding up any authentication endpoints yourself!

Part 2: What is the blueprint doing?

The ‘auth’ blueprint uses the python MSAL library to mediate authentication.

  1. The python web application uses the Microsoft Authentication Library (MSAL) to obtain a JWT access token from the Microsoft identity platform (formerly Azure AD v2.0):
  2. The token contains the app roles of the authenticated user; accordingly, the blueprint code checks that the uses has at a minimum ‘Read’ access to the application, or authentications fails.
  3. The access token is saved into the flask session, for use later as a bearer token to authenticate the user in requests (e.g. calling the Microsoft Graph).
Overview

More details around the workflow can be found in the MSAL documentation, start here: https://github.com/Azure-Samples/ms-identity-python-webapp

Part 3: Applying this to a plotly dash application

Dash is a library for creating responsive web apps written declaratively in python (no javascript required!).

Dash is powered by flask, so we are able to apply this same approach to securing dash applications. I followed the excellent walk-through at https://hackersandslackers.com/plotly-dash-with-flask/ for the initial “add flask to dash” approach.

The trick is to start up Dash with a flask server that we control. To do this, we can add the dash app initialization as a step in the flask ‘create_app’ method (again, this assumes flask application factory pattern is utilized, in this case it’s probably mandatory).

Your ‘create_app’ method can add these 2 lines, right after the flask routes and the authentication blueprint are registered:

# Register an embedded dash app
from .dashapp import create_dashapp
app = create_dashapp(app)

Then add the file ‘dashapp.py’ containing a factory method ‘create_dashapp’ that takes the flask app as a parameter (called server’ to avoid confusion with the dash ‘app’). Now, we can start the dash app up, using our existing flask app!

def create_dashapp(server):
    """
    Init our dashapp, to be embedded into flask
    """
    app = dash.Dash(
        __name__,
        server=server,
        url_base_pathname='/dash/')
    app.config['suppress_callback_exceptions'] = True
    app.title = 'My Dash App'
    
    #... add dash callbacks & layout code here
    
    # End of create_dashapp method, return the flask app aka server (not the dash app)
    return app.server

The last step is how we fold in the authentication piece. We can protect the dash views, so that if a user navigates directly to ‘/dash’ will be redirected to authenticate as we expect. Add the following method to dashapp.py:

from blueprints.auth.decorators import login_required
def protect_dashviews(dash_app):
    for view_func in dash_app.server.view_functions:
        if view_func.startswith(dash_app.config.url_base_pathname):
            dash_app.server.view_functions[view_func] = login_required(dash_app.server.view_functions[view_func])

And add an additional line to the ‘create_dashapp’ factory method:

def create_dashapp(server):
    """
    Init our dashapp, to be embedded into flask
    """
    app = dash.Dash(
        __name__,
        server=server,
        url_base_pathname='/dash/')
    app.config['suppress_callback_exceptions'] = True
    app.title = 'My Dash App'
    protect_dashviews(app) #***We just added this line***

Your dash app is now authenticated!

One last thing to note in the dash app, is that I found it quite tricky to get the name of the authenticated user inside of the dash app components, especially immediately after the user authenticates. To achieve this, add the following component to the dash app layout:

dcc.Location(id='url', refresh=False), # represents the URL bar, doesn't render anything

Then add a callback to grab the name, which is fired when the redirection from the authentication workflow takes the user back to the dash app:

# Add callback for writing name of user to navbar
    @app.callback(Output('navbar-navigation', 'label'),
                  Input('url', 'pathname'))
    def user_name_to_navbar(pathname):
        if 'user' in flask.session:
            user = flask.session['user'].get('name', 'unknown')
        else:
            user = 'unknown'
        return user

Obviously, the above relies on the existence of the element ‘navbar-navigation’, so change the output to wherever you need to write the username to.

Summary

I hope you found this useful. Chat in the comments with your suggestions on how to make this better, or raise a Pull Request.

Happy flask’ing!

NetOffice.Excel – Add Validation to a Cell

My most recent blogs have been focused on Excel-DNA, and the pretty cool ability it brings to easily add your own custom ribbons.  This blog is looking at the other component of writing a C# app that can talk to Excel – namely NetOffice.Excel.

NetOffice.Excel provides the ability to interact with Excel COM elements, in a (mostly) painless way.  Think workbooks, worksheets, ranges, cells, read, write, format, copy… and pretty much all else you are able to do through Excel.

This blog will focus on the ability to create validation within a cell.  From excel, you can find that option here:

image

Code

As always, feel free to dive straight into the code and take snippets at will.  you can find the full project at:

https://bitbucket.org/andysprague44/netoffice.excel.extensions

And the code for this blog:

https://bitbucket.org/andysprague44/netoffice.excel.extensions/src/91d59b64a54fc0342064f5a529bf6f65685466da/NetOffice.Excel.Extensions/Extensions/CellValidationExtensions.cs?at=master&fileviewer=file-view-default

Getting set-up

In order to test out our application, I’d suggest getting immediately familiar with Excel-DNA, as this gives us a way to launch Excel from Visual Studio direct and gives us a way to see interactively what is going on.  Otherwise we’d be updating a closed excel worksheet, and you’d have to launch it after manually to see the impact.  And hey, nobody likes anything manual.  Follow this tutorial to get set-up with a Hello World application that we can use to test.

https://andysprague.com/2017/02/03/my-first-custom-excel-ribbon-using-excel-dna/

If you already have an application that uses NetOffice.Excel but not Excel-DNA, then the code should still be relevant, you’ll just be on your own testing it out.

Adding validation with a hard-coded list

If you are on this blog and know this one, but you’re getting errors with long lists, don’t panic, skip to the next section.

So essentially we are replicating:

image

Add this extension method to your project:

using System;
using System.Collections.Generic;
using System.Linq;
using NetOffice.ExcelApi;
using NetOffice.ExcelApi.Enums;

namespace NetOffice.Excel.Extensions.Extensions
{
public static class CellValidationExtensions
{
public static void AddCellListValidation(this Range cell, IList&lt;string&gt; allowedValues, string initialValue = null)
{
var flatList = allowedValues.Aggregate((x, y) =&gt; $"{x},{y}");
if (flatList.Length &gt; 255)
{
throw new ArgumentException("Combined number of chars in the list of allowedValues can't exceed 255 characters");
}
cell.AddCellListValidation(flatList, initialValue);
}

private static void AddCellListValidation(this Range cell, string formula, string initialValue = null)
{
cell.Validation.Delete();
cell.Validation.Add(
XlDVType.xlValidateList,
XlDVAlertStyle.xlValidAlertInformation,
XlFormatConditionOperator.xlBetween,
formula,
Type.Missing);
cell.Validation.IgnoreBlank = true;
cell.Validation.InCellDropdown = true;
if (initialValue != null)
{
cell.Value = initialValue;
}
}
}
}

Hopefully this should be easy enough to follow.  First, we aggregate the list to a comma separated string (which is the ‘Source’ or ‘formula’), then we call the cell.Validation method with some ugly excel settings rearing up.  More description of these in the documentation at

https://msdn.microsoft.com/en-us/library/microsoft.office.interop.excel.validation.add(v=office.15).aspx?cs-save-lang=1&cs-lang=csharp#code-snippet-1

Then to test it:

1. Add a button in the custom ribbon to add cell validation (COMING SOON – right clicking on the cell can also provide this functionality)

&lt;group id="Group1" label="My Group"&gt;
&lt;button id="Add Validation" label="Validate!" imageMso="FastForwardShort" size="large" onAction="OnAddValidation"&gt;
&lt;/group&gt;

2. Add this code to customRibbon.cs:

using static MyExcelAddin.CellValidationExtensions;
...

public void OnAddValidation(IRibbonControl control)
{
var allowedValues = new List&lt;string&gt; { "England", "30", "6", "Australia", "Equals", "Thrashing" };
((Worksheet)_excel.ActiveSheet).Range("A1").AddCellListValidation(allowedValues);
}

Launch excel and Click the new button, and you should now see the cell validation in cell A1:

image

To change the error message displayed when invalid data is entered use:

cell.Validation.ErrorMessage = "No Chance";

So we then get:

image

Cell Validation for long list

This method breaks down for long lists, are there is a limit of (I think) 255 chars for this length of the comma seperated list.  In this case all we can do is save the values to a range, and reference that to provide our cell validation.

Add this method to your CellValidationExtensions class:

public static void AddCellListValidation(this Range cell, Range allowedValuesRange, string initialValue = null)
{
var fullAddress = $"='{allowedValuesRange.Worksheet.Name}'!{allowedValuesRange.Address}";
cell.AddCellListValidation(fullAddress, initialValue);
}

The difference here is that the formula/source is now referencing a range, rather than a hard-coded string.  Simples!

To test, change the method in CustomRibbon.cs to the following:

public void OnAddValidation(IRibbonControl control)
{
var allowedValues = new List&lt;string&gt; { "England", "30", "6", "Australia", "Equals", "Thrashing" };
var activeSheet = ((Worksheet)_excel.ActiveSheet);
var range = activeSheet.Range("A1:F1");
range.Value = allowedValues.ToArray();
activeSheet.Range("A2").AddCellListValidation(range);
}

First, save the list to a range, then use this range to populate the validation.   In a real application you would probably want to create a hidden sheet, and save the allowed value list there, it works the same.

The result is this:

image

Now you know how to use NetOffice.Excel to add cell validation!   I’m always open to feedback, please comment what you think below.

Until next time.

Custom Icons in Excel-DNA Custom Ribbon
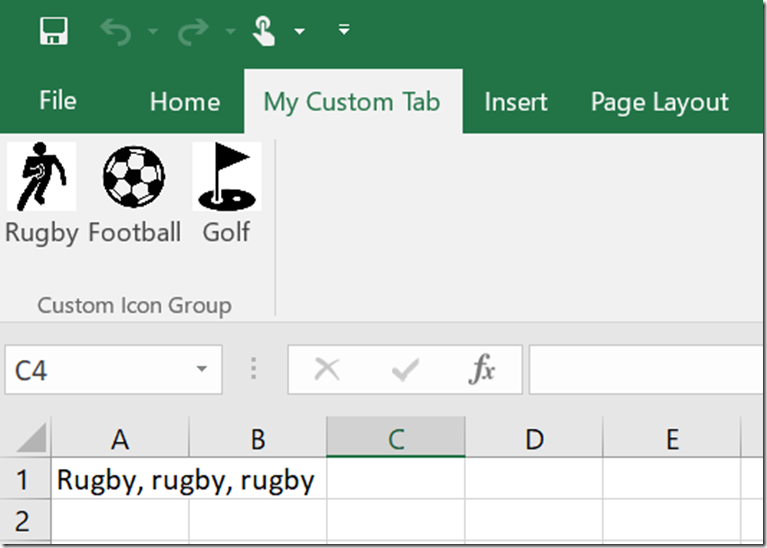
When adding options to your menu, you’ll need icons.  There are about 9,000 already available icons (yikes!), so you’ll probably find one that is suitable and is consistent with the UX of Excel.  You can also add custom icons.  As always code is available on my bit bucket account: https://bitbucket.org/andysprague44/excel-dna-examples/…CustomImage

Built-in icons

You can add a built-in icon to your custom ribbon using the imageMso argument.  For example:

<button id="refreshButton" imageMso="RefreshMenu" size="large" onAction="onRefreshMenu" />

How can you see the available icons?  The best way is a great excel add-in that allows you to browse the full icon gallery.  Install from https://imagemso.codeplex.com/releases/view/116271  – instructions on how to access are in the documentation tab of the same website.  The result?

imageMsoGallery

Alternatively there is an online gallery at http://www.spreadsheet1.com/office-excel-ribbon-imagemso-icons-gallery-page-01.html – however, this seems like a subset of the available icons only, and there is no search function.

Custom Icons

You can also add custom icons using the getImage argument.  For this you need to

    1. Add an image to your resources
    2. Add a getImage argument to the element in the customRibbon.xml file
    3. Add an action handler to serve up your image.

The action is invoked when you first load up the ribbon and the image will appear.

Note that any image is allowed but excel displays small PNG icons style images best – I use http://www.flaticon.com/ to get free icons.  A favourite summer holiday snap is not going to render very well.

Add an image to resources

Start by adding the image to a folder called Resources in the project.  Then to add the image to the strongly typed resources of the project itself, go to project properties (right click on project in the project Explorer -> Properties), then choose Resources.  Add your resource from the top menu using ‘Add Existing File’.

AddResource

Then, right click on the Resources.resx file and choose ‘Run Custom Tool’ to generate a strongly typed reference Properties.Resources.rugbyimage that we can call in our action handler later on.

image


Add custom xml element

Add to CustomRibbon.xml:

<button id="RugbyImageButton" label="Rugby" getImage="GetImage" size="large" onAction="OnPressMe"/>

Note that the option is ‘getImage’ as opposed to using ‘imageMso’ when using built in images.

Add action handler

Then you need to add an action handler to serve up your image:

CustomRibbon.cs:

public Bitmap GetImage(IRibbonControl control)
        {
            switch (control.Id)
            {
                case "RugbyImageButton": return new Bitmap(CustomImage.Properties.Resources.RugbyImage);
                default: return null;
            }
        }

Using the switch on the ID of the element allows us to easily add multiple images in the future using the same action handler.

This is the final result!

image

Show Message Boxes with Excel-DNA

Often a simple way to get user feedback is to show a pop-up message box.  Read on for a tutorial on how to do this.  As an example, this is the result we will get from this blog:

SimpleMessageBox

The second section of this blog deals with how to handle message boxes during asynchronous operations, as this is a little more involved.  All code examples can be found at: https://github.com/andysprague44/excel-dna-examples/tree/master/MessageBox

The below assumes a simple Excel-DNA project has been created as per my tutorial at: https://andysprague.com/2017/02/03/my-first-custom-excel-ribbon-using-excel-dna/

Simple Message Box

To achieve this in your Excel-DNA project there are several steps.

1. Add a class that displays the message box:

using System;
using System.Windows.Forms;
using MsgBox = System.Windows.Forms.MessageBox;

public interface IExcelWinFormsUtil
{
    DialogResult ShowForm(Form form);
    DialogResult MessageBox(string text, string caption, MessageBoxButtons buttons, MessageBoxIcon icon);
}


public class ExcelWinFormsUtil : IExcelWinFormsUtil
{
    public DialogResult ShowForm(Form form)
    {
        return ShowModal(form.ShowDialog);
    }

    public DialogResult MessageBox(string text, string caption, MessageBoxButtons buttons, MessageBoxIcon icon)
    {
        return ShowModal(parentWindow => MsgBox.Show(parentWindow, text, caption, buttons, icon));
    }

    private static DialogResult ShowModal(Func<IWin32Window, DialogResult> dialogFunc)
    {
        var parentWindow = new NativeWindow()
        parentWindow.AssignHandle(ExcelDna.Integration.ExcelDnaUtil.WindowHandle);
      
        try
        {
            return dialogFunc(parentWindow);
        }
        finally
        {
            parentWindow.ReleaseHandle();
        }
    }
}

The critical line is parentWindow.AssignHandle(ExcelDna.Integration.ExcelDnaUtil.WindowHandle);.  Here we use Excel-DNA to get a reference to the Excel window, and then use this to display a message box within the context of excel (as a child window).

2. Next is to create an instance of this class when the add-in loads.  In the CustomRibbon.cs class:

public override string GetCustomUI(string ribbonId)
{
    _excel = new Application(null, ExcelDna.Integration.ExcelDnaUtil.Application);
    _excelWinFormsUtil = new ExcelWinFormsUtil();

    string ribbonXml = GetCustomRibbonXML();
    return ribbonXml;
}

And to make the form visible to the controller any action that requires message boxes can be run like this:

public void OnPressMe(IRibbonControl control)
{
    using (var controller = new ExcelController(_excel, _thisRibbon, _excelWinFormsUtil))
    {
        controller.PressMe();
    }
}

3. The last thing to do is to call it!  The below is called from the ExcelController.cs class but could be anywhere in your code-base:

public void PressMe()
{
    var dialogResult = _excelWinFormsUtil.MessageBox(
        "This is a message box asking for your input - write something?",
        "Choose Option",
        MessageBoxButtons.YesNoCancel,
        MessageBoxIcon.Question);

    switch (dialogResult)
    {
        case DialogResult.Yes:
          _excel.Range("A1").Value = "Yes chosen";
          break;
        case DialogResult.Cancel:
          _excel.Range("A1").Value = "Canceled";
          break;
        case DialogResult.No:
          _excel.Range("A1").Value = null;
          break;
    }
}

MessageBoxButtons contains the standard options, YesNo, OkCancel etc.

There are some changes to how excel itself handles windows from versions 2013 onwards but I have tested before and after so should work in most Excel versions (though no guarantees).

Asynchronous Message Boxes

When calling message boxes from background threads things get a little tricky.  Excel is at heart a single threaded application, so any Excel COM interaction has to be passed back to the main thread.  You’ll know when you’ve hit this problem if the focus returns to the wrong workbook after a message box is displayed, or there may be just a cryptic COM exception.

Excel-DNA provides help with this, which is to use the function ExcelAsyncUtil.QueueAsMacro.  This waits for the main thread to be free then runs the code that interacts with Excel, i.e if the user is editing a cell at the time the function is called, it will wait until editing is finished, and then and only then call the code.

However, if we want to show a message box in this workflow we often want to wait for user feedback i.e. YesNo, OkCancel.  the default method does not block execution so any code that uses a returned DialogResult will always use DialogResult.None.  This means we need to do some more work with the provided function.

I’ve implemented as an extension method that does this, add the following class to your application:

using System;
using System.Threading.Tasks;
using Application = NetOffice.ExcelApi.Application;
using ExcelDna.Integration;

namespace MessageBoxAddin.Extensions
{
    public static class ExcelDnaExtensions
    {
        /// <summary>
        /// Run a function using ExcelAsyncUtil.QueueAsMacro and allow waiting for the result.
        /// Waits until excel resources are free, runs the func, then waits for the func to complete.
        /// </summary>
        /// <example>
        /// var dialogResult = await excel.QueueAsMacroAsync(e =>
        ///     _excelWinFormsUtil.MessageBox("Message", "Caption", MessageBoxButtons.YesNo, MessageBoxIcon.Question) );
        /// </example>
        public static async Task<T> QueueAsMacroAsync<T>(this Application excel, Func<Application, T> func)
        {
            try
            {
                var tcs = new TaskCompletionSource<T>();
                ExcelAsyncUtil.QueueAsMacro((x) =>
                {
                    var tcsState = (TaskCompletionSource<T>)((object[])x)[0];
                    var f = (Func<Application, T>)((object[])x)[1];
                    var xl = (Application)((object[])x)[2];
                    try
                    {
                        var result = f(xl);
                        tcsState.SetResult(result);
                    }
                    catch (Exception ex)
                    {
                        tcsState.SetException(ex);
                    }
                }, new object[] { tcs, func, excel });
                var t = await tcs.Task;
                return t;
            }
            catch (AggregateException aex)
            {
                var flattened = aex.Flatten();
                throw new Exception(flattened.Message, flattened);
            }
        }
    }
}

Then to call, include the extensions class in your imports:

using static MessageBoxAddin.Extensions.ExcelDnaExtensions;

and call as in this example:

public void OnPressMeBackgroundThread(int delay)
        {
            Task.Factory.StartNew(
                () => RunBackgroundThread(delay),
                CancellationToken.None,
                TaskCreationOptions.LongRunning,
                TaskScheduler.Current
            );
        }
        public async Task RunBackgroundThread(int delay)
        {
            Thread.Sleep(delay*1000);
            
            //get user input as part of a background thread
            var dialogResult = await _excel.QueueAsMacroAsync(xl =>
                _excelWinFormsUtil.MessageBox(
                    "Message box called from background thread",
                    "Long Running Thread",
                    MessageBoxButtons.OKCancel,
                    MessageBoxIcon.Information)
            );

            //do stuff depending on dialog result in the background

            //finally, call back to excel to write some result
            ExcelAsyncUtil.QueueAsMacro(() =>
            {
                _excel.Range("A1").Value = dialogResult.ToString();
            });
        }

So what are we doing here?  By using a TaskCompletionSource we can force completion of the function before continuing using ‘await tcs.Task’.   This is turn means we can await the QueueAsMacroAsync function and do something with the MessageBox result.

AsyncMessageBox

Excel-DNA Custom Ribbon Cheat Sheet

In this blog I’ll give some helpful snippets of code to work with Custom Ribbons in Excel-DNA.

I will assume you have already got a project that creates a custom ribbon, and you now want my amazing insight on how to add something that is more elaborate than, say, a button that writes a hard-coded string to cell A1 of the current worksheet .  If this isn’t true head over to my previous blog: My First Custom Excel Ribbon using Excel-DNA.

This is a companion to the main documentation which you can find here.  This goes into a bit more detail on some of the below snippets.

A quick side-note:

If you are looking for a cheat-sheet for how to interact with Excel itself i.e. read and write to cells, you actual want information on NetOffice.Excel.  This blog is focused on the Excel-DNA features only.  I’ll be writing a part 2 blog on NetOffice.Excel specific stuff in future but for now, well, search Google.  I mention this as the distinction confused me when I first started working in this space!

Now on with the blog…

Auto-Completion of the customui xml

The first one is a biggy:  auto-completion of xml elements in the ribbon definition.  Once you have this you can see all available options in the current scope as a drop-down.  Neato!

XmlAutoComplete

In theory it should be as simple as adding a customUI element to the xml definition that loads the schema, but that didn’t work for me (comment if you have worked it out, would be really appreciated and I’ll update).  By all means try yourself though:

&lt;?xml version="1.0" encoding="utf-8" ?/&gt;
&lt;customUI xmlns="http://schemas.microsoft.com/office/2006/01/customui" onLoad="OnLoad"/&gt;
&lt;!--Your ribbon definiton--/&gt;
&lt;/customUI&gt;

Otherwise the following steps will do the trick:

  1. Download the customUi.xsd schema from the Excel-DNA project
  2. Open the xml file in Visual Studios, right click anywhere in the window, and choose Properties from the menu
  3. In the ‘schemas’ field, click the elipsis (…) on the right, and add the schema ‘customUi.xsd’ from the save location of step 1

AddCustomUISchema

Now it’s just up to you to get experimenting.

Write Back To Excel From a Background Thread

As soon as you release control from your application and have some background thread doing long running tasks so that the user can interact with Excel in the meantime, the below is vital.

It’s not a helpful error message but you may get something like the below when editing a cell at the same time as the completion of your background task:

‘An exception of type ‘System.Runtime.InteropServices.COMException’ occurred in NetOffice.dll but was not handled in user code’

With Excel-DNA this is luckily a super simple fix.

Task.Factory.StartNew( () => DoSomeWork() ) 
    .ContinueWith(t => WriteSomethingToExcel());

becomes

Task.Factory.StartNew( () => DoSomeWork() ) 
    .ContinueWith(t => 
        ExcelAsyncUtil.QueueAsMacro(() => WriteSomethingToExcel()));

As soon as the user frees up Excel (i.e. stops editing a cell) then and only then is ‘WriteSomethingToExcel’ performed.

ImageMso Gallery

When adding options to your menu, you’ll need icons.  There are about 9,000 already available icons (yikes!), so you’ll probably find one that is suitable and is consistent with the UX of Excel.  you can also add custom icons.

Built-in icons

You can add a built-in icon to your custom ribbon using the imageMso argument.  For example:

&lt;button id="refreshButton" imageMso="RefreshMenu" size="large" onAction="onRefreshMenu" /&gt;

How can you see the available icons?  The best way is a great excel add-in that allows you to browse the full icon gallery.  Install from https://imagemso.codeplex.com/releases/view/116271 – instructions on how to access are in the documentation tab of the same website.  The result?

imageMsoGallery

Alternatively there is an online gallery at http://www.spreadsheet1.com/office-excel-ribbon-imagemso-icons-gallery-page-01.html – however, this seems like a subset of the available icons only, and there is no search function.

Custom Icons

You can also add custom icons using the getImage argument in the CustomRibbon.xml definition.  A walkthrough of this is at https://andysprague.com/2017/07/03/custom-icons-in-excel-dna-custom-ribbon/

CustomRibbon.xml:

&lt;button id="CustomImageButton" label="Custom Image" getImage="GetImage" size="large" onAction="OnPressMe"/&gt;

CustomRibbon.cs:

public Bitmap GetImage(IRibbonControl control)
 {
 switch (control.Id)
   {
     case "CustomImage": return new Bitmap(Properties.Resources.CustomImage);
     default: return null;
   }
 }

Message Boxes

Show a pop-up message box and get user inputs.

&lt;/pre&gt;
public DialogResult MessageBox(string text, string caption, MessageBoxButtons buttons, MessageBoxIcon icon)
{
return ShowModal(parentWindow =&gt; MsgBox.Show(parentWindow, text, caption, buttons, icon));
}

private static DialogResult ShowModal(Func&lt;IWin32Window, DialogResult&gt; dialogFunc)
{
var parentWindow = new NativeWindow();
parentWindow.AssignHandle(ExcelDna.Integration.ExcelDnaUtil.WindowHandle);

try
{
return dialogFunc(parentWindow);
}
finally
{
parentWindow.ReleaseHandle();
}
}
&lt;pre&gt;

More details, including how to handle this in background threads, at https://andysprague.com/2017/07/03/show-message-boxes-with-excel-dna/

Dynamic Menus

See http://stackoverflow.com/a/34033472, at some point I’ll do a blog with more details on this one but I’ll basically be copying that answer anyhow.  Credit to the original poster Caio will obviously be given 😉