In this blog I’ll give some helpful snippets of code to work with Custom Ribbons in Excel-DNA.
I will assume you have already got a project that creates a custom ribbon, and you now want my amazing insight on how to add something that is more elaborate than, say, a button that writes a hard-coded string to cell A1 of the current worksheet . If this isn’t true head over to my previous blog: My First Custom Excel Ribbon using Excel-DNA.
This is a companion to the main documentation which you can find here. This goes into a bit more detail on some of the below snippets.
A quick side-note:
If you are looking for a cheat-sheet for how to interact with Excel itself i.e. read and write to cells, you actual want information on NetOffice.Excel. This blog is focused on the Excel-DNA features only. I’ll be writing a part 2 blog on NetOffice.Excel specific stuff in future but for now, well, search Google. I mention this as the distinction confused me when I first started working in this space!
Now on with the blog…
Auto-Completion of the customui xml
The first one is a biggy: auto-completion of xml elements in the ribbon definition. Once you have this you can see all available options in the current scope as a drop-down. Neato!
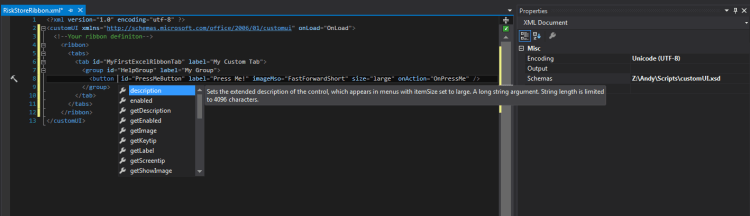
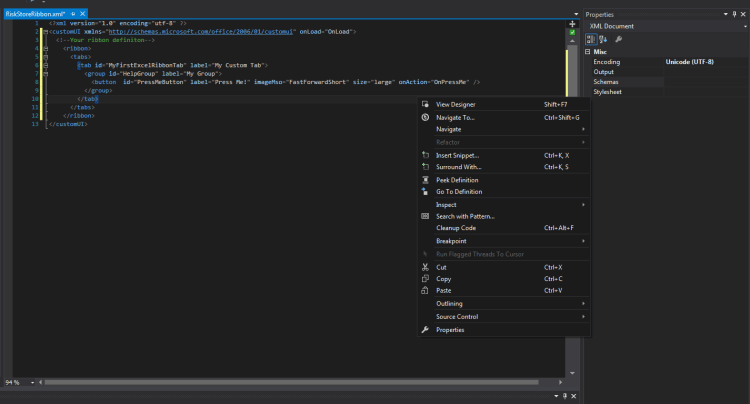
In theory it should be as simple as adding a customUI element to the xml definition that loads the schema, but that didn’t work for me (comment if you have worked it out, would be really appreciated and I’ll update). By all means try yourself though:
<?xml version="1.0" encoding="utf-8" ?/> <customUI xmlns="http://schemas.microsoft.com/office/2006/01/customui" onLoad="OnLoad"/> <!--Your ribbon definiton--/> </customUI>Otherwise the following steps will do the trick:
- Download the customUi.xsd schema from the Excel-DNA project
- https://raw.githubusercontent.com/Excel-DNA/ExcelDna/master/Distribution/XmlSchemas/customUI.xsd
- Tested on Office 2010 and Office 365 (version 2106); might work for older versions but you are on your own.
- Open the xml file in Visual Studios, right click anywhere in the window, and choose Properties from the menu
- In the ‘schemas’ field, click the elipsis (…) on the right, and add the schema ‘customUi.xsd’ from the save location of step 1
Now it’s just up to you to get experimenting.
Write Back To Excel From a Background Thread
As soon as you release control from your application and have some background thread doing long running tasks so that the user can interact with Excel in the meantime, the below is vital.
It’s not a helpful error message but you may get something like the below when editing a cell at the same time as the completion of your background task:
‘An exception of type ‘System.Runtime.InteropServices.COMException’ occurred in NetOffice.dll but was not handled in user code’
With Excel-DNA this is luckily a super simple fix.
Task.Factory.StartNew( () => DoSomeWork() ) .ContinueWith(t => WriteSomethingToExcel());becomes
Task.Factory.StartNew( () => DoSomeWork() ) .ContinueWith(t => ExcelAsyncUtil.QueueAsMacro(() => WriteSomethingToExcel()));As soon as the user frees up Excel (i.e. stops editing a cell) then and only then is ‘WriteSomethingToExcel’ performed.
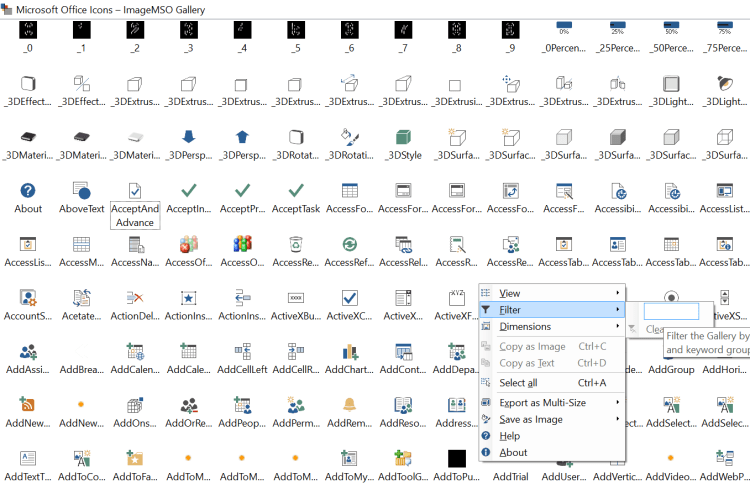
ImageMso Gallery
When adding options to your menu, you’ll need icons. There are about 9,000 already available icons (yikes!), so you’ll probably find one that is suitable and is consistent with the UX of Excel. you can also add custom icons.
Built-in icons
You can add a built-in icon to your custom ribbon using the imageMso argument. For example:
<button id="refreshButton" imageMso="RefreshMenu" size="large" onAction="onRefreshMenu" />How can you see the available icons? The best way is a great excel add-in that allows you to browse the full icon gallery. Install from https://imagemso.codeplex.com/releases/view/116271 – instructions on how to access are in the documentation tab of the same website. The result?
Alternatively there is an online gallery at http://www.spreadsheet1.com/office-excel-ribbon-imagemso-icons-gallery-page-01.html – however, this seems like a subset of the available icons only, and there is no search function.
Custom Icons
You can also add custom icons using the getImage argument in the CustomRibbon.xml definition. A walkthrough of this is at https://andysprague.com/2017/07/03/custom-icons-in-excel-dna-custom-ribbon/
CustomRibbon.xml:
<button id="CustomImageButton" label="Custom Image" getImage="GetImage" size="large" onAction="OnPressMe"/>CustomRibbon.cs:
public Bitmap GetImage(IRibbonControl control) { switch (control.Id) { case "CustomImage": return new Bitmap(Properties.Resources.CustomImage); default: return null; } }Message Boxes
Show a pop-up message box and get user inputs.
</pre> public DialogResult MessageBox(string text, string caption, MessageBoxButtons buttons, MessageBoxIcon icon) { return ShowModal(parentWindow => MsgBox.Show(parentWindow, text, caption, buttons, icon)); } private static DialogResult ShowModal(Func<IWin32Window, DialogResult> dialogFunc) { var parentWindow = new NativeWindow(); parentWindow.AssignHandle(ExcelDna.Integration.ExcelDnaUtil.WindowHandle); try { return dialogFunc(parentWindow); } finally { parentWindow.ReleaseHandle(); } } <pre>More details, including how to handle this in background threads, at https://andysprague.com/2017/07/03/show-message-boxes-with-excel-dna/
Dynamic Menus
See http://stackoverflow.com/a/34033472, at some point I’ll do a blog with more details on this one but I’ll basically be copying that answer anyhow. Credit to the original poster Caio will obviously be given 😉